Tips and Scaffolds to Aid Handwriting Skills
Do you remember when you first learned to drive a car? There is a lot of thinking going on! The number of things you had to think about - how to start the vehicle, checking the mirrors, making sure the seat was in the correct position, looking carefully at the dashboard, making sure you used your blinker, the list goes on and on.

Learning to write legibly is similar to learning how to drive a car. At first, it takes a lot of practice and cognitive energy, but once automatic driving and handwriting are done easily, it frees up mental energy for other things. A lot is going on.
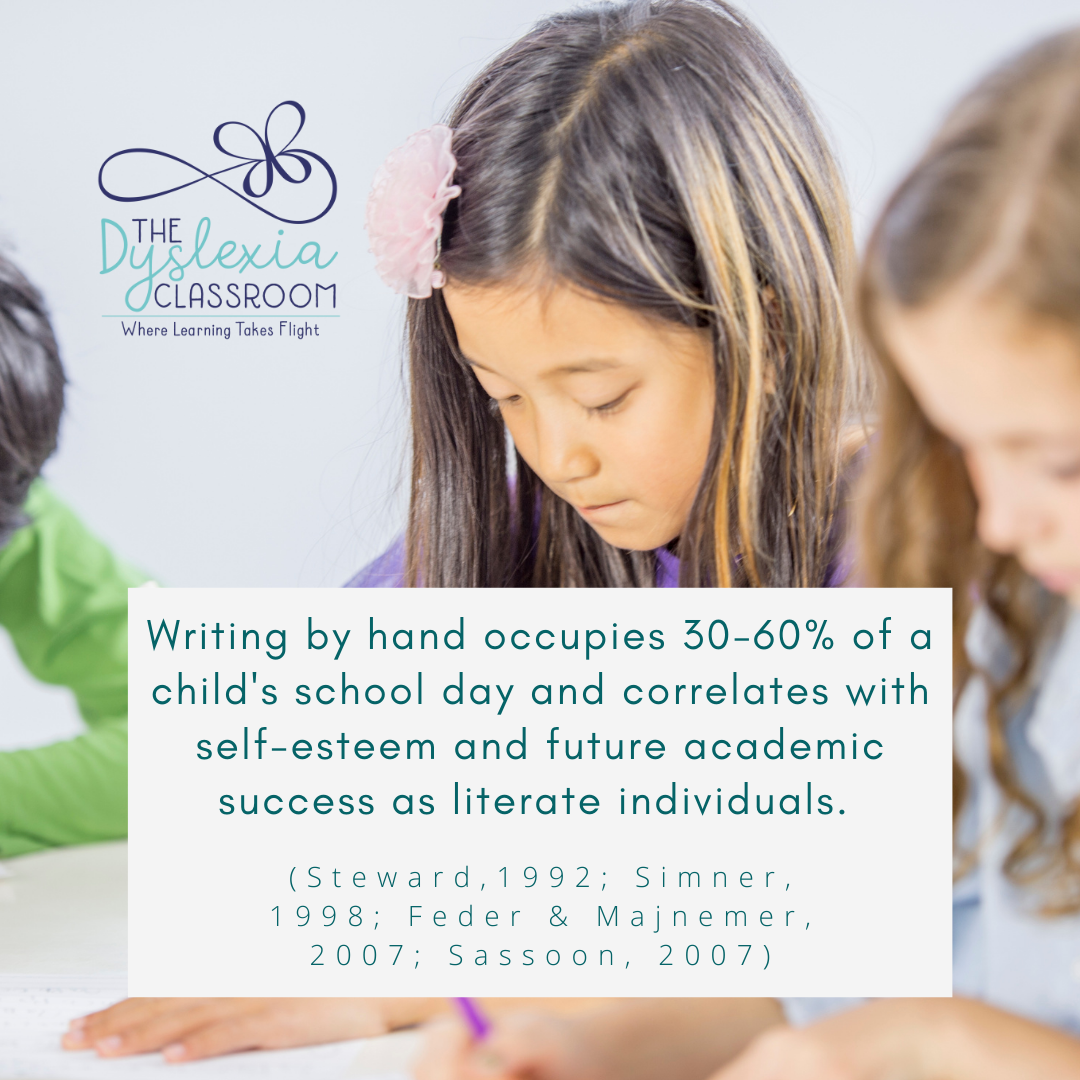
Handwriting instruction is essential for all students, especially those with dyslexia and dysgraphia. Until students can form letters with reasonable legibility and speed, their concentration and focus are often spent on letter production. When students have not reached automaticity of letter formation, it taxes the working memory and places higher demands on cognitive resources.
Why Teach Handwriting?
Teaching handwriting helps students with letter learning, word reading, and writing. When kindergarteners are explicitly taught letter formation linked to the concept that letters represent speech sounds, syllables, and words, these images are stored in the brain's language center (Beringer & Wolf, 2015).
We want to ensure our earliest learners are presented with the necessary skills and language to create these stored linguistic symbols that lead to automaticity in writing, to move to the complex core skills that later writing demands. A LOT goes into handwriting instruction, from body and paper position to pencil grasp and letter formations. I'm sharing some of the tools and strategies that I use in my dyslexia therapy sessions.
Handwriting Position
Have you ever been to a class or conference where you were required to take notes, yet the set-up was unconducive to comfortable writing? This happened to me recently when I had to sit with my back to the speaker and ended up with my writing paper on my lap, turned around in my chair, and struggled to feel comfortable in my note taking.
Reflecting on this moment, I realized how many of my clients must feel when asked to sit still, attend to the lesson, produce work, and focus when they are not in a supportive sitting position at the table.
I often talk to parents and teachers about how poor posture and positioning can impact a student's ability to produce quality work. Something as simple as having their feet positioned flat on the ground can make a big difference—things like a desk or table height, chair comfort, and height and lighting all impact handwriting.
Addressing Posture
Sitting with poor posture can stress your muscles, joints, and ligaments. Children with unstable postures use excess energy to maintain their stability and balance, affecting their ability to complete fine motor tasks and school work. We may see this when students rest their heads on their non-dominant hands, complain or show fatigue when writing, slouch in their chairs, lean forward close to their paper, and hang their non-writing hands to their side. All of these show poor core strength and body position for writing. Sitting with a good writing posture increases stability and provides a sturdy foundation for written output.
Setting the stage for handwriting work is essential for all students and is achieved with proper positioning at student seats and desks. Once at their seat, we want students to follow the "90-90-90 angle rule" to set the stage for optimal handwriting performance.
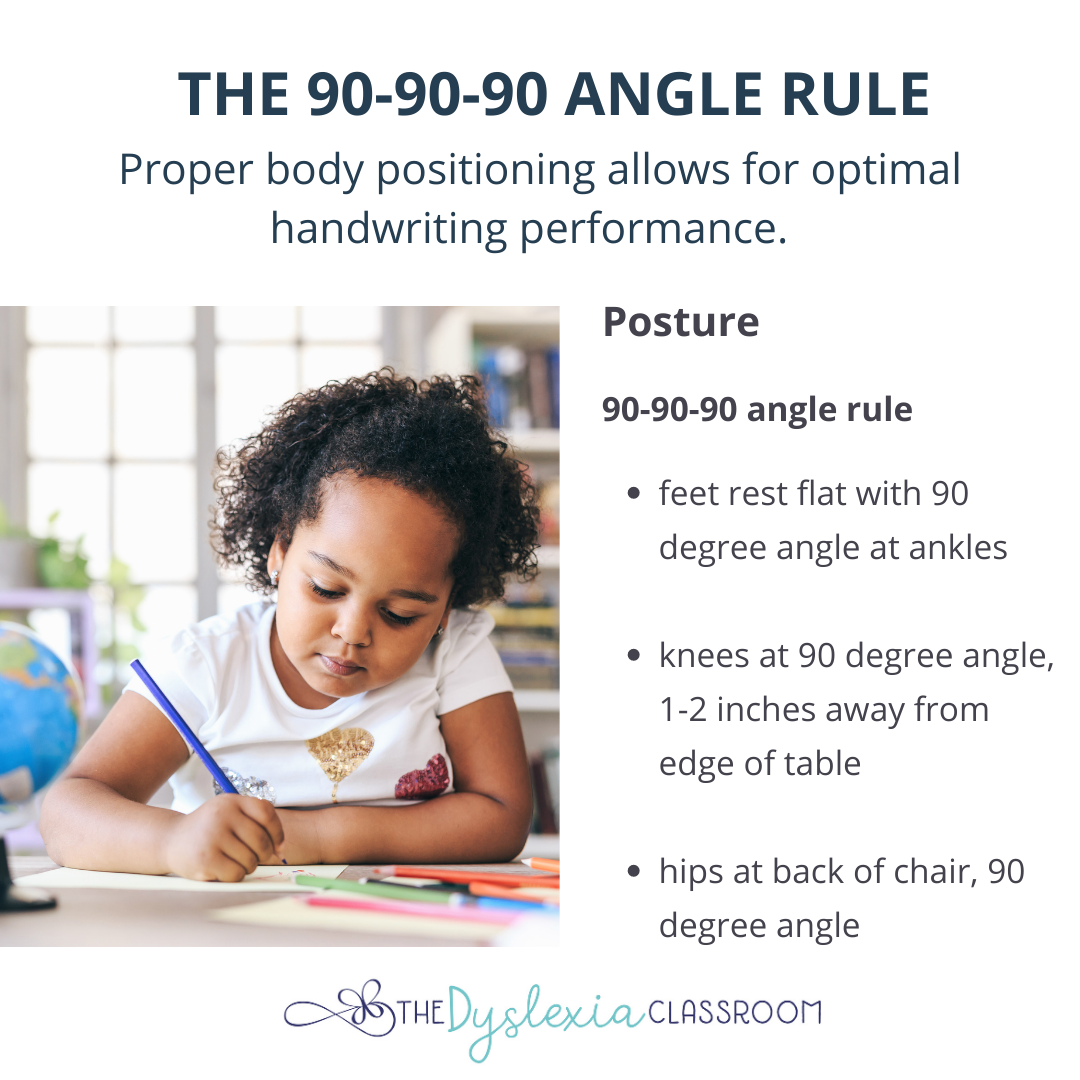
The 90-90-90 Angle Rule
- feet rest flat with a 90-degree angle at the ankles
- knees at a 90-degree angle, 1-2 inches away from the edge of the table
- hips at the back of the chair, 90-degree angle
Desks or tables that are too high or low can be adjusted. If a chair is too high, placing boxes under the feet will provide stability at the ankles.
Addressing Paper Position
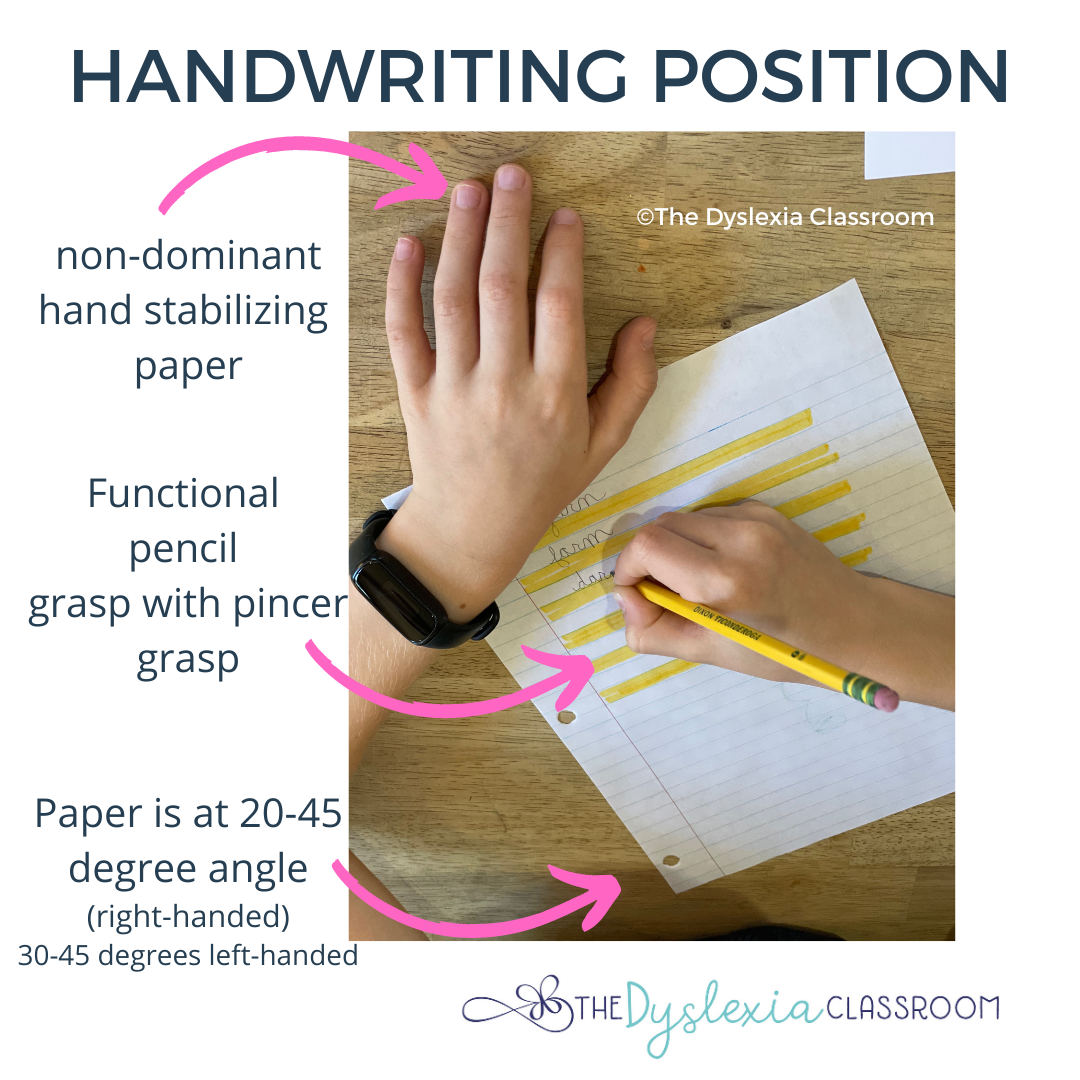
Once students are in the proper position with their bodies following the 90-90-90 angle rule, then the position of the paper should be monitored and addressed. The proper placement and tilt of the paper allow students to comfortably write, stabilize the paper, and see what they are writing.
Tilting the paper allows students to see what they are writing as it is being put on paper and promotes proper pencil grasp and wrist placement. The paper tilt for right-handed students is at a 20-45 degree angle. For left-handed students, the tilt of the paper is 30-45 degrees to help with proper hand placement. As a scaffold, I will draw an arrow or place a sticker in the bottom corner to indicate that this should point to their stomach. This helps remind students of the paper placement. I use this scaffold as needed and will gradually release the scaffold as students become automatic with their paper placement.
The non-dominant hand is used to stabilize the paper. Students use this hand to aid in moving the paper upwards as they write. This prevents the writing hand from moving down, falling off the desk/table, or bending at the wrist. The goal is to have students move the paper up with their non-dominant hand instead of moving their writing hand down - allowing for better fluidity and comfort when writing. Find the below resource in the library.

Developing Proper Pencil Grasp
To hold a pencil correctly, a child must have control of hand muscles, especially the pincer grasp. Developing large and fine motor skills is the basis for handwriting skills and proper instruction. There are pre-strokes to handwriting that can be observed to help drive instructional needs. Often when working with older or early elementary students who struggle with handwriting, I will embed some work with fine motor skills.
Read about simple ways to build fine motor skills with children here and here.
Once students have fine motor control, we can begin explicit handwriting instruction. We know that the knowledge of letter names and fluency in letter naming in kindergarten are among the best predictors of later reading success (Catts et al., 2015). Handwriting, in turn, helps students store letters as linguistic symbols. 📝
When students have the precise motor sequence for forming each letter, it is automated and recalled without conscious effort. This automaticity leaves mental energy for the written composition of writing. Students who struggle with automatic letter writing will also struggle with putting thoughts onto paper because their energy is expended on forming letters instead of content. Read more about explicit handwriting here.
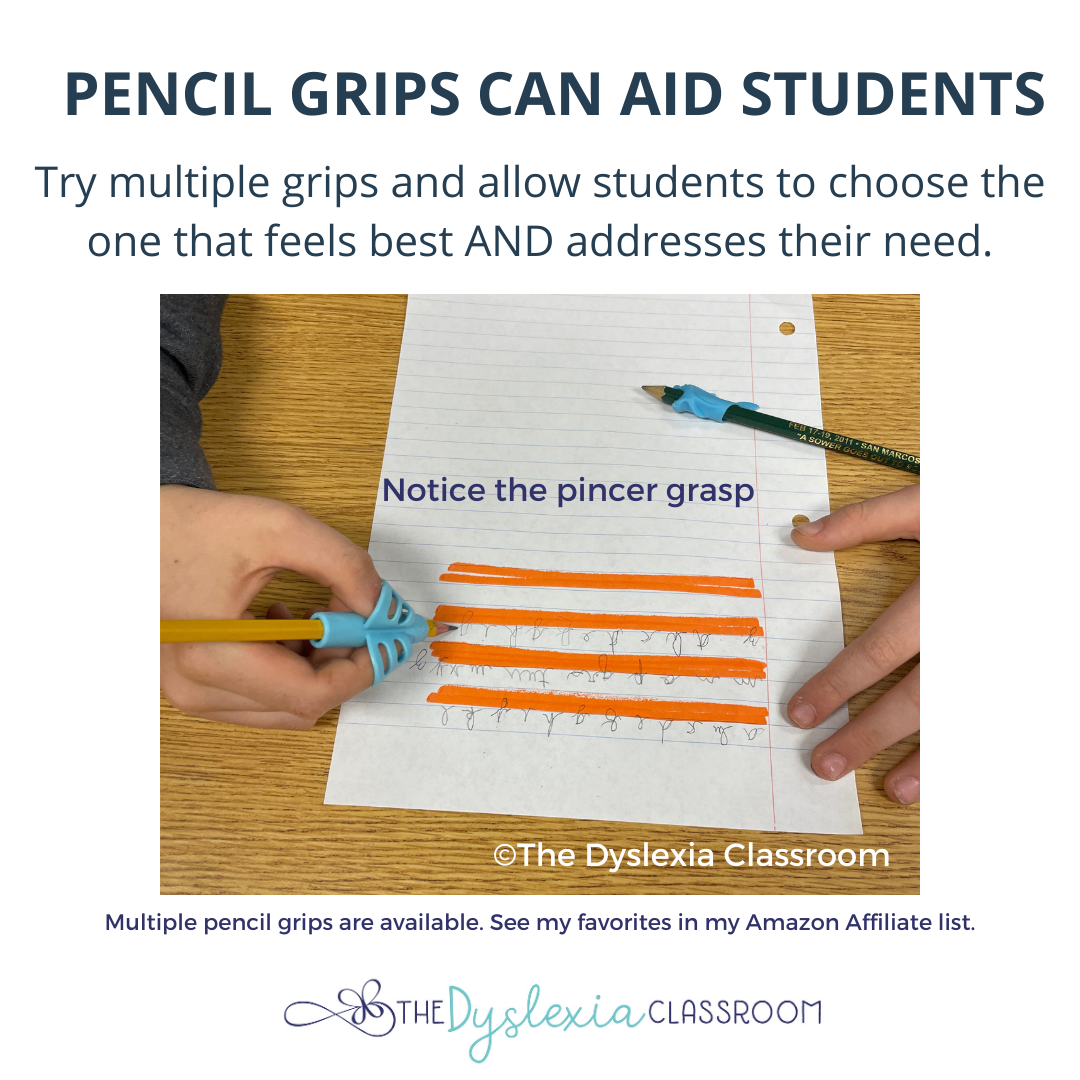
Using different pencil grips can benefit students who struggle with the proper pincer grasp or have weakness in their hands. I have several different pencil grips available to students and allow them to choose the one that feels best AND addresses their unique needs. You can find lots of different grips online. I have added my favorites to my Amazon list. *affiliate list

Sometimes a student doesn't need a pencil grip but a simple reminder as to where to place their fingers. For this, an easy scaffold is to put a sticker where the fingers go. So simple - yet effective!
Spatial Relationships
When we ask students to engage in handwriting, they need to draw on their memory of what each letter looks like, develop a motor plan for writing that letter, and think about sizing, formation, alignment, and spacing - it's a lot. Prior to writing letters, students need development of pre-writing strokes. Read more here about these and grab the development chart in the freebie library
For many students, controlling the alignment and spacing of letters is a challenge. My older students with dysgraphia often struggle to properly space letters and words on the page. This spatial relationship causes the inability to utilize space properly. For many students, they will have letters or words run together or fall off the lines and edges of the page. If you have students who struggle with managing or controlling letters on the line, this is a quick and easy way to engage students. I find this especially helpful for my older students as it honors their age and doesn't come across as baby-ish.
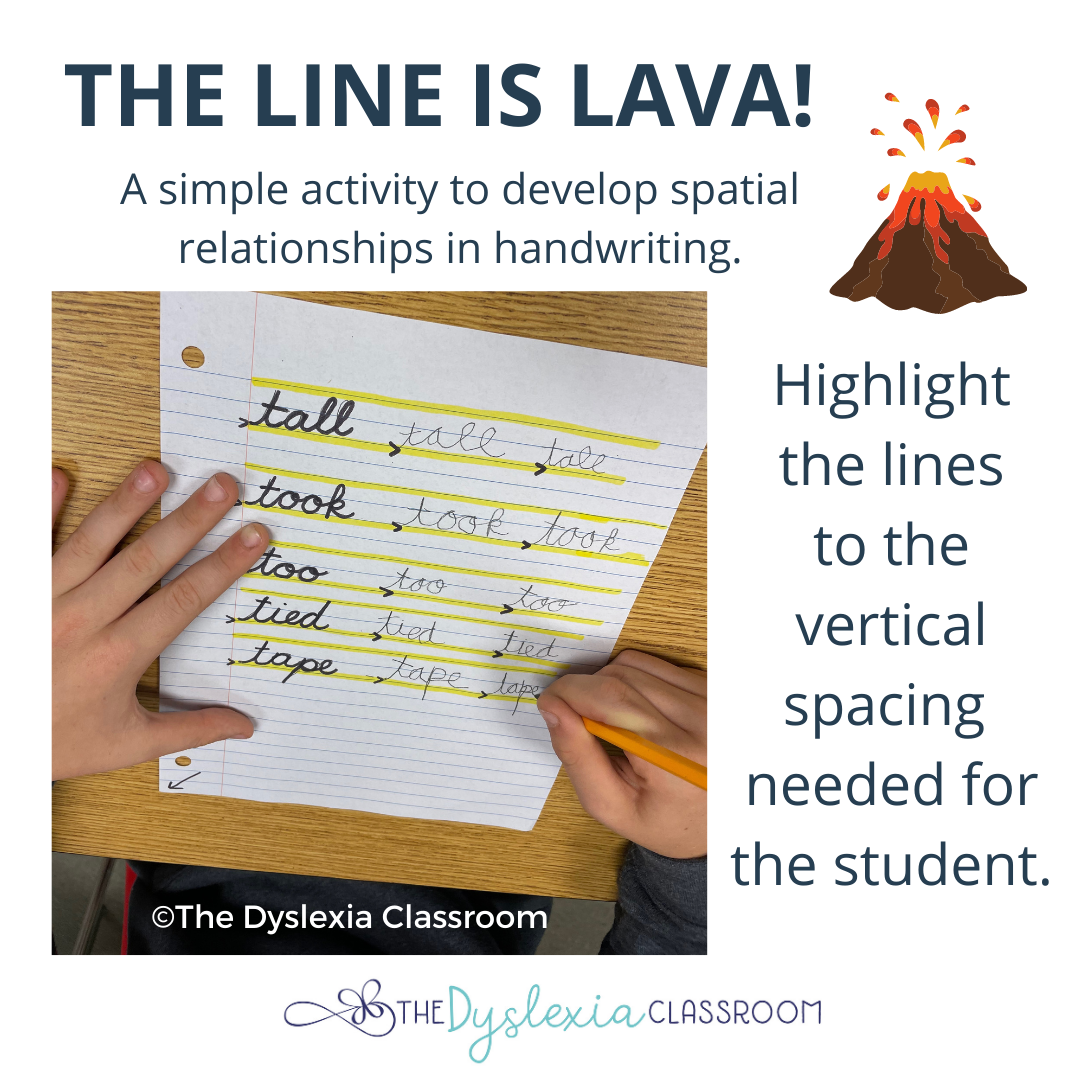
To help develop this spatial awareness, we play the game "The Line is Lava!". It is a simple and effective way to bring awareness to the spatial needs of letters and words on the page in relation to the line and the margins.
Simply highlight the lines to the space needed and have students work to keep the letters out of the lava. While you can purchase premade highlighted paper, I prefer to quickly make my own so that I can tailor the vertical spacing as needed. Students often begin with larger vertical spacing, and as they gain control of their fine motor skills and letter movements, we condense the space.
We also discuss those letters that "dip" into the lava, and the kids like to make a silly hissing sound as they dip those letters (f, g, j, p, q, y, and cursive z) into the lava. So fun!
Explicit Handwriting Instruction
Whether you choose to work on print or cursive, providing explicit instruction and ample practice is critical for creating the necessary muscle memory to build letter formations. Cursive instruction has gotten more attention over the last few years, and with good reason! Research also shows that there are considerable benefits to teaching cursive.
Read about the benefits of cursive writing with instructional tips here.
Want to learn more? Check out these related blog posts and grab the cursive handwriting poster in my freebie library! Sign up here.
I hope these handwriting tips and scaffolds are helpful. Let me know if you play "The Line is Lava!" or use any of the other scaffolds or tips with any students.
You can also learn more about handwriting instruction in the Together in Literacy podcast episode 2.12
Some handwriting resources you may find useful:

Freebie cursive anchor chart - in the freebie library! Join HERE!

This information is the intellectual property of @2016 The Dyslexia Classroom. Do not use or repurpose without expressed permission from The Dyslexia Classroom. Please give The Dyslexia Classroom an attribution if you use, reference, or quote/paraphrase copyrighted materials. This includes but is not limited to blogs, social media, and resources.

Hey there!
My name is Casey Harrison
Welcome to The Dyslexia Classroom's blog. I'm a Certified Academic Language Therapist, Dyslexia Therapist, and creator of The Dyslexia Classroom. My passion is to help educators and parents understand their dyslexic learners to help them reach their fullest potential. I'm glad you are here!
Recent Posts

Join The Dyslexia Classroom!
Subscribe to access the freebie library and be the first to know about courses, resources, updates, tips and more!
Categories
All Categories